 How to make an effective DIY CO2 Yeast Reactor;
 When establishing a planted tank, beside planning medium to strong lights and fertilisation regime, we have to find an effective way how to inject the most important element, CARBON.
Plants can't grow without carbon. There are many ways how one can introduce CO2; Pressurized systems can be expensive, DIY Yeast CO2 Reactor and Commercial diffuser/reactors with CO2 tablets.
The last one is useless. Believe me I tried it. The Pressurised system is too expensive for my budget and requires strong lights, that I don't have. With my low lights (1.7WperGallon) I needed something like the famous DIY (do it yourself) Yeast CO2 Reactor, that suits the student budget.
I will not explain in this article how one can make the whole DIY Reactor and how to make the Yeast mix since there is lots of info about that on the net, and they are all fine and easy to understand (at the end of this article you will find links to DIY CO2 projects).
In this article I would like to explain how to make an effective DIY CO2 without any leakages that usually occur on the bottle lid where the air tubing is connected to, as well as how to inject the CO2 into the aquarium water without loosing much of the precious gas. This info is based on my experience, the way I did it, and it is working fine for me.
1. After you gather all you need (one 2 liter Coke bottle with the lid, air tubing and a small air stone) we can start preparing the lid/tubing connection.
NOTE; In past time many aquarists did the same mistake all over and over again which led to CO2 leakage at the lid/tubing connection. They would make a hole in the lid that was the same measure, in diameter, as the tubing. After that, they would pull it through the lid and silicone the lid from both sides so the CO2 wouldn't leak. This project would fail each time and many would keep on adding more and more silicone to the connection and...yes, a big headache!!!
The secret is actually very simple :-) all you have to do is get a drill that is smaller than the tubing, in diameter. I use the 4.5mm drill. If there is no number on the drill you can take the measure in a different way.
 Take one of the drills and try gently to put it inside the tubing. The 4.5mm should fit perfectly, not big nor small. See the picture above. This part is VERY IMPORTANT for this project, so pay attention!!! If the drill is not of the right size you will have CO2 leakage, and that is the last thing you wanna have.
------------------------------------------------------------------------------------------------
2. Place the lid on the ground and squeeze it between the shoes (do not do this with bare feet!!!). Drill the hole in the middle of the lid and hold the machine with two hands so it is more stable, otherwise you will drill through the floor. To make sure you wont damage the floor, place an old peace of wood that has no value to you or your family and place the lid on it. Drilling takes one second.
The hole is made, now lets go to the tubing preparation.
------------------------------------------------------------------------------------------------
3. The part of the tubing that is going to be pushed/pulled through the lid should be cut at 45 degrees like shown on the picture. ------------------------------------------------------------------------------------------------
4. When ready take the lid and push the 45 degrees cut tubing end through the lid. It will not go completely through since the hole is drilled smaller than the tubing is. This is part of the plan. And the plan is to make an air tight connection. ------------------------------------------------------------------------------------------------
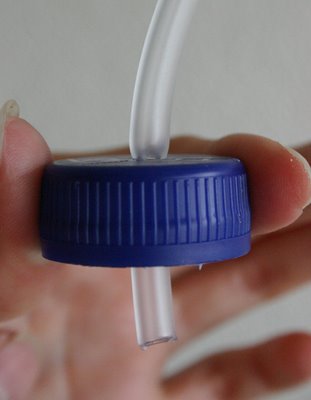
5. Grab the tubing with pliers and pull it through the lid like shown on the photo. The tubing part that will be inside the bottle should not be longer than 3cm. ------------------------------------------------------------------------------------------------
6. Now you have an air tight lid/tubing connection where no CO2 leakage is possible. When the Yeast mix is ready you can put the lid back to the bottle. You can see on this photo how tight the connection really is. Perfect :-) No need to silicone it! This part is done and ready to go! ------------------------------------------------------------------------------------------------------------------------------------------------------------------------------------------------
This part applies only to those who have JUWEL aquariums like I do.
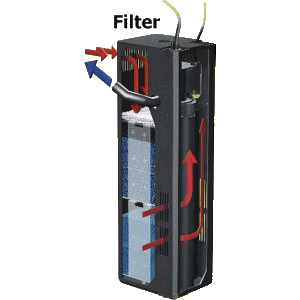
For quite a while I had my DIY Yeast Reactor connected to a plastic CO2 diffuser bell(shown at the end of this page) inside the tank. My mixture would produce one bubble every 1-3 seconds. The fact is that CO2 gets dissolved pretty fast in the water. In my case I could hear every approx. 10-15 minutes a BLUP!!! sound coming from the aquarium. That was the CO2 over-flow. The plastic diffuser bell couldn't diffuse the amount of CO2 produced by the DIY Y.R. I needed all the CO2 produced so I decided to connect the tubing directly to the filter out-let. You can see the filter outlet on the filter photo, the blue arrow is the water out-let.
 The out-let on Juwel filters is made out of two plastic tubes (see next photo). I drilled a hole in the part that is directly connected to the power head. The hole is the same size as the tubing. Connect both plastic out-let tubes and push the CO2 tubing through them so it comes out the water direction (blue arrow on the photo). NOTE; the two part out-let is not yet to be connected to the filter box.
 Attaching an air stone to the end of the CO2 tubing is gonna make CO2 bubbles very small and they will stay in the water for much longer then big bubbles would. I attached the smallest air stone so there is some space left in side the filter out-let for the water to yet by the air stone pressing out the small CO2 bubbles. After the air stone has been attached pull the whole tubing inside the filter out let tubes. The air stone should not be visible, but somewhere in the middle of the out-let tubes. Now you are ready to attach the out-let tubes to the Juwel filter box (power head).
 After the Yeast mix is made and the bottle is connected to the air-tight tubing, you will be able to see small bubbles coming out of the filter outlet.
------------------------------------------------------------------------------------------------
This is the CO2 Diffuser Bell I used before and will not use it again unless in very small aquariums (less then 40liters). My current aquarium is 180 liters. I would like to recommend you some of the best DIY CO2 sites/links. There you will find the best way how to mix a proper Yeast mix, so it last longer. The CO2 Fever and
A Treatise on DIY CO2 Systems for Freshwater-Planted Aquaria by John LeVasseur .
I hope you will find this illustrated article helpful.
Kind regards, Dusko Bojic.
